
If you want to create whatsapp business account, you can do it in just a few minutes. You need your phone number, a smartphone, and access to WhatsApp Web. The WhatsApp Business app helps you manage chats and business info, while SheetWA lets you send bulk messages easily without technical steps. You don’t need special skills to create a whatsapp business account. Just follow some simple steps, and you’ll be ready to connect with your customers.
Tip: Keep your phone handy and make sure you have a stable internet connection before you start.

Key Takeaways
Making a WhatsApp Business account is fast. You only need a smartphone, a business phone number, and internet.
The WhatsApp Business app has auto replies and a business profile. WhatsApp Web lets you send messages from your computer.
A business profile helps customers trust you. It shows your business name, category, and contact details.
Use SheetWA to send many messages at once. You do not need special skills or the WhatsApp Business API.
Always ask customers before you send them messages. This helps you not get marked as spam.
Keep your business profile up to date. Give correct information to help customers trust you and stay interested.
If you change from personal to business WhatsApp, back up your chats. This keeps you from losing important conversations.
Put time gaps between messages when sending many at once. This helps your account not get flagged for spam.
Overview of WhatsApp Business Account Creation
Making a whatsapp business account is easy and fast. You only need to do a few steps. After that, you can talk to your customers. Here is what you need and how it works.
What You Need to Get Started
Get everything ready before you begin. Here is a checklist:
You need a smartphone with the whatsapp business app.
You need a business phone number to check your account.
You need internet to get the app and check your number.
If you have these things, you can start now.
WhatsApp Business App vs. WhatsApp Web
You may wonder how the whatsapp business app and whatsapp web are different. The app helps small businesses talk to customers. You can chat, set up auto replies, and make a business profile. Whatsapp web lets you use whatsapp on your computer. It does not have special business tools.
Table to show the differences:
Feature | WhatsApp Business App | WhatsApp Web |
|---|---|---|
Purpose | For small businesses, customer interaction | Use whatsapp on a computer |
Automated Messaging | Greeting and away messages | No automation |
Customization Options | Limited, no whatsapp business api access | No customization |
Contact Management | Uses phone’s address book | Uses company’s CRM platform |
If you want to send many messages, you can use SheetWA with whatsapp web. SheetWA helps you send special messages to lots of people. You do not need to set up the whatsapp business api or do hard steps. Just connect your list and start sending messages.
Benefits of WhatsApp Business Account
A whatsapp business account gives your business many good things:
You get a business profile that helps customers trust you.
Customers know they are talking to a real business.
You can message customers and get quick answers.
The app is free, so you save money and run your business.
You can set up auto replies when you are busy.
To make a whatsapp business account, follow these steps: get the whatsapp business app, open it, agree to the rules, sign up with your business number, check your number, and add your business info. You do not need the whatsapp business api for these steps. The app has all you need to begin, and SheetWA helps you talk to more customers easily.
Download WhatsApp Business App
Getting started with the whatsapp business app is simple. You just need to find the right app, check your device, and follow a few steps to launch the app. Let’s walk through each part so you can set up your business account without any trouble.
Find and Install the App
You can find the whatsapp business app in the app store on your phone. If you use an Android device, open Google Play Store. If you have an iPhone, use the Apple App Store. Search for "WhatsApp Business" and look for the official app with the green chat icon.
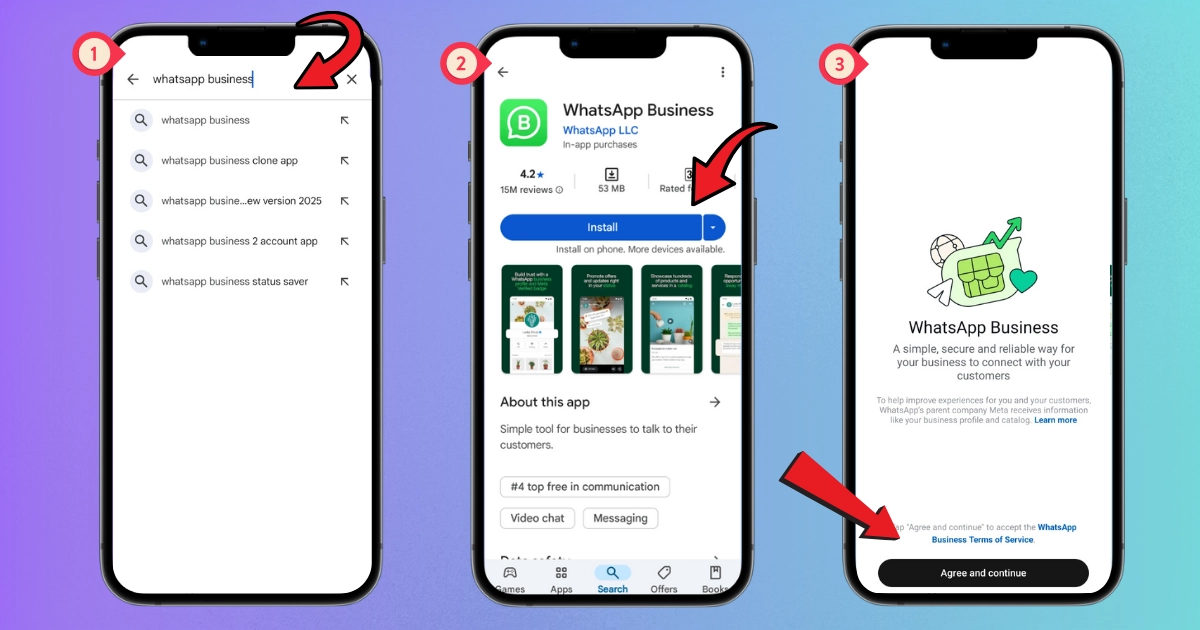
How you can install whatsapp business app:
Open your app store.
Type "WhatsApp Business" in the search bar.
Tap the app from the results.
Press the install button.
Wait for the download to finish.
Tip: Make sure you have enough space on your phone before you start the download. A stable internet connection helps the process go faster.
Sometimes, you might run into problems when you try to install or set up the app. Here are some common issues and quick fixes:
You don’t get the verification code. Double-check your phone number and make sure your internet is working. Wait a few minutes before trying again.
You see a message that your number is already in use. Backup your chats, delete your personal whatsapp account, and start fresh with the business app.
You have trouble with business verification. Use your real business name and make sure it matches your documents. If you still have problems, contact support.
Device Compatibility
Not every phone works with whatsapp business app. Most modern smartphones support it, but older devices may not. You need a phone with Android 4.0.3 or newer, or iOS 12 or newer. If your phone is too old, you might not be able to use all the features.
Quick table to help you check if your device is ready:
Device Type | Minimum Version Needed | Can Install? |
|---|---|---|
Android Phone | 4.0.3 | Yes |
iPhone | iOS 12 | Yes |
Windows Phone | Not supported | No |
Tablet | Not recommended | Maybe |
Note: If you use a tablet, you may not get the best experience. The app works best on smartphones.
Launch and Accept Terms
After you finish downloading, you can launch the app. Tap the whatsapp business app icon on your home screen. The app will ask you to grant permissions for contacts, photos, and notifications. You need to allow these so you can send messages and manage your business profile.
When you open whatsapp for the first time, you’ll see some important terms and privacy policies. Here’s what you should know:
WhatsApp shares some user data with Facebook, like your device info and online status.
You must give consent for data sharing. WhatsApp keeps your messages private with end-to-end encryption.
You get 30 days to accept the new policy. If you change your mind, you have another 30 days to opt out.
Alert: Always read the privacy policy before you agree. If you have questions, check the help section in the app.
Once you accept the terms, you’re ready to set up your business account. You can now start connecting with customers and growing your business on whatsapp.
Register and Verify Your Business WhatsApp Number
Setting up your whatsapp business account means you need to register your business phone number. This step connects your business to your customers and lets you use all the features in the whatsapp business app. You’ll find the process simple if you follow each step closely.
Enter Phone Number
When you open the whatsapp business app for the first time, you’ll see a welcome screen. The app asks you to enter your business phone number. This number becomes your official contact for all customer chats. Make sure you use a number that you want your customers to see. You can’t use numbers from certain countries, like Crimea, Cuba, Iran, North Korea, or Syria. If your business is in one of these places, whatsapp won’t let you create a business account.
Tip: Double-check your phone number before you move on. If you enter the wrong number, you’ll have trouble later.
Steps you need to follow:
Open the whatsapp business app and accept the terms.
Type in your business phone number.
Tap “Next” to continue.
Receive and Enter Verification Code
After you enter your number, whatsapp sends you a verification code. You get this code by SMS or a phone call. The code proves that you own the number and want to use it for your whatsapp business account. When you get the code, type it into the app right away.
Verification Method | Description | Challenges |
|---|---|---|
Green Tick | Shows your business is verified and official. | No big challenges for most users. |
Blue Tick | Protects your account from fraud and impersonation. | Hard to get, takes time, and costs more. |
Most small businesses use the green tick. The blue tick is for bigger brands and needs more work during the business verification process.
Note: If you don’t get the code, wait a few minutes. Sometimes, network issues cause delays.
Troubleshoot Verification Issues
Sometimes, you might not receive the code or face problems during verification. Don’t worry! You can fix most issues with a few simple checks.
Make sure you entered your phone number correctly, including the country code.
Check your network signal. Try switching to WiFi if your mobile data is weak.
Turn off Do Not Disturb mode and check if your phone blocks SMS messages.
Look online to see if whatsapp servers are down.
Ask your mobile provider if they block service messages.
Use a regular mobile number, not a VoIP or virtual number.
If your number is banned, check for any suspicious activity.
Don’t request the code too many times in a row. This can block you for a while.
🚩 If you still can’t verify your phone number, try restarting your phone or reinstalling the whatsapp business app. Sometimes, a fresh start solves the problem.
Once you finish these steps and verify your number, your whatsapp business account is ready to go. You can start chatting with customers and growing your business.
Create a WhatsApp Business Profile

Making your whatsapp business account is more than just adding your phone number. You also need to make a business profile. This profile helps customers know who you are. It also shows what your business does. Let’s go through each step together. This will help you make a good first impression.
Add Business Name and Category
When you start your business profile, the app asks for your business name. Pick a name that matches your brand. Make sure it is easy for people to remember. You cannot change this name later, so check it twice before you finish. Next, pick your business category. This helps people find you when they look for services or products.

What you need:
Business Name
Category (like Restaurant, Retail, Services, etc.)
Tip: Use your real business name. If you have a shop, use the name on your sign or website. This helps customers trust you and know who you are.
Upload Profile Image
A good profile image makes your business look professional. Customers trust businesses with clear and friendly pictures. You can use your company logo or a photo that shows your brand. The app lets you upload an image from your phone.
Why a good profile image is important:
Businesses with a nice profile image get more messages from customers.
A clear photo helps you stand out and builds trust.
Customers feel safe talking to businesses that look real.
When you make your profile, pick a high-quality image. Do not use blurry or pixelated photos. If you have a logo, use it. If not, choose a picture that shows what you do.
Read More : Easy Steps to Update Your WhatsApp Profile Picture
Enter Business Details
Now you need to add more details to your profile. This helps customers learn about your business and how to contact you. The app gives you spaces for your address, business description, hours, and contact info.
What you should add:
Description: Write a short bio about what your business does. Keep it simple and clear.
Address: Add your location if you want local customers to find you.
Hours of Operation: Tell people when you are open so they know when to message you.
Contact Details: Add your website, email, or other ways to reach you.
Product Catalog: If you sell things, you can add a catalog so customers see what you offer.
Field | Best Practice |
|---|---|
Business Description | Write a short and clear bio about what your business does and what makes you special. |
Address | Add your location if you want local customers to find you. |
Business Hours | Tell people when you are open so they know when to contact you. |
Note: A complete whatsapp business profile makes a great first impression. Customers are more likely to message you and buy from you when your details are clear and correct.
Take your time to fill in every part of your profile. This guide helps you make your business look professional and trustworthy. When customers know who you are and how to reach you, you will get more messages and sales.
Review Profile Settings
You’ve added your business name, category, and details. Now it’s time to review your profile settings. This step helps you make sure everything looks professional and accurate. Customers trust businesses that keep their profiles up to date. Let’s walk through what you should check.

Simple checklist to help you review your WhatsApp Business profile:
Verify Your Number: Double-check your business phone number. Make sure you confirmed it with the one-time password (OTP). If you see any mistakes, fix them right away. Your number is how customers reach you.
Check Your Business Name and Category: Look at your business name. Is it spelled correctly? Does it match your brand? Check your category too. Pick the one that fits your business best. This helps customers find you when they search.
Update Your Details: Review your address, business hours, and description. Make sure your address is correct. Check your business hours so customers know when you’re open. Read your description out loud. Does it sound clear? Does it tell people what you do?
Customize Your Settings: Go to your business settings. Set your business hours. Create quick replies for common questions. Set up away messages for times when you’re not available. Adjust your privacy settings so you control who can see your info.
Add or Update Your Catalog: If you sell products, check your catalog. Make sure your items have clear names, prices, and photos. Remove anything you no longer offer.
Tip: Review your profile every few months. Update your info if you move, change your hours, or add new products. A fresh profile shows customers you care.
Table to help you remember what to check:
Setting | What to Look For | Why It Matters |
|---|---|---|
Phone Number | Correct and verified | Customers can contact you |
Business Name | Matches your brand | Builds trust |
Category | Relevant to your business | Easier for customers to find |
Address | Accurate and up to date | Helps local customers |
Business Hours | Clear and correct | Sets customer expectations |
Description | Simple and honest | Explains your business |
Catalog | Updated products and prices | Shows what you offer |
Quick Replies | Useful answers to common questions | Saves you time |
Away Messages | Friendly note when you’re offline | Keeps customers informed |
Privacy Settings | Controls who sees your info | Protects your business |
Take a few minutes to go through each setting. Small changes can make a big difference. When your profile looks sharp, customers feel confident reaching out. You’ll stand out from other businesses and make a great first impression.
Convert Personal WhatsApp to Business Account
Switching your personal whatsapp to a business account is a smart move if you want to connect with customers and keep your chats organized. You don’t need to start from scratch. You can bring your old messages and contacts with you. Let’s walk through the steps so you don’t lose anything important.
Backup and Data Transfer
Before you switch, you should back up your chats and contacts. This way, you keep all your conversations safe. Here’s how you can do it:
Download the whatsapp business app from the App Store or Google Play.
Open the app and agree to the terms and conditions.
Enter the same phone number you use for your personal whatsapp.
Verify your number with the code sent to your phone.
When the app asks, choose to back up and import your chats and contacts. This step makes sure you don’t lose any messages.
Set up your business profile. Add your business name, description, website, and business hours.
Read More : How to Back Up WhatsApp Chats in Simple Steps
Tip: Always double-check your backup before you switch. If you skip this step, you might lose important chats.
Switch to Business Account
After you finish the backup, you’re ready to switch. The whatsapp business app will guide you through each step. You just need to follow the prompts on your screen. Enter your phone number, verify it, and let the app import your old chats. You’ll see your messages and contacts in the new business account.
Quick table to help you remember the steps:
Step | What You Do |
|---|---|
Download App | Get whatsapp business from your app store |
Open App | Agree to terms and conditions |
Enter Number | Use your personal whatsapp number |
Verify Number | Enter the code sent to your phone |
Import Data | Backup and transfer chats and contacts |
Set Up Profile | Add business info and hours |
Note: You can use both personal and business whatsapp accounts at the same time if you want. This helps you keep work and personal chats separate.
Changes After Conversion
When you switch to a whatsapp business account, some things change. Your chat history and contacts move over if you follow the backup steps. You keep your old messages, so you don’t lose track of customer conversations. Only high-quality message templates transfer to your new account. Low-quality or rejected templates stay behind.
You can use both personal and business whatsapp accounts together. This is called whatsapp coexistence. It lets you manage work and personal chats without mixing them up. Your chat history and contacts stay safe and secure.
Some things to remember:
Your chats and contacts move to the business account if you back them up.
Only approved message templates transfer.
You can use both accounts at the same time.
Your data stays secure during the switch.
🚩 If you notice missing chats or contacts, check your backup settings. Make sure you followed each step before switching.
Switching to a whatsapp business account helps you look professional and keeps your business organized. You get new tools to manage customer chats and grow your business.
SheetWA Setup for WhatsApp Web Messaging
Setting up SheetWA for WhatsApp Web messaging is easy when you follow the right steps. This guide helps you get started, so you can send messages to your customers without any hassle. You do not need to worry about the whatsapp business api or complicated technical steps. Let’s walk through the process together.
Prepare WhatsApp Web
First, you need to open WhatsApp Web on your computer. Grab your phone and make sure you have the whatsapp business app installed. Open a browser like Chrome or Edge. Type web.whatsapp.com in the address bar. You will see a QR code on the screen.
Take your phone, open the whatsapp business app, and tap the three dots in the top right corner. Choose “Linked Devices.” Tap “Link a Device.” Point your phone’s camera at the QR code on your computer screen. Your chats will appear on the computer. Now, you are ready to use whatsapp on your desktop.
Tip: Keep your phone connected to the internet while using WhatsApp Web. If your phone goes offline, WhatsApp Web will stop working.
Install SheetWA Extension
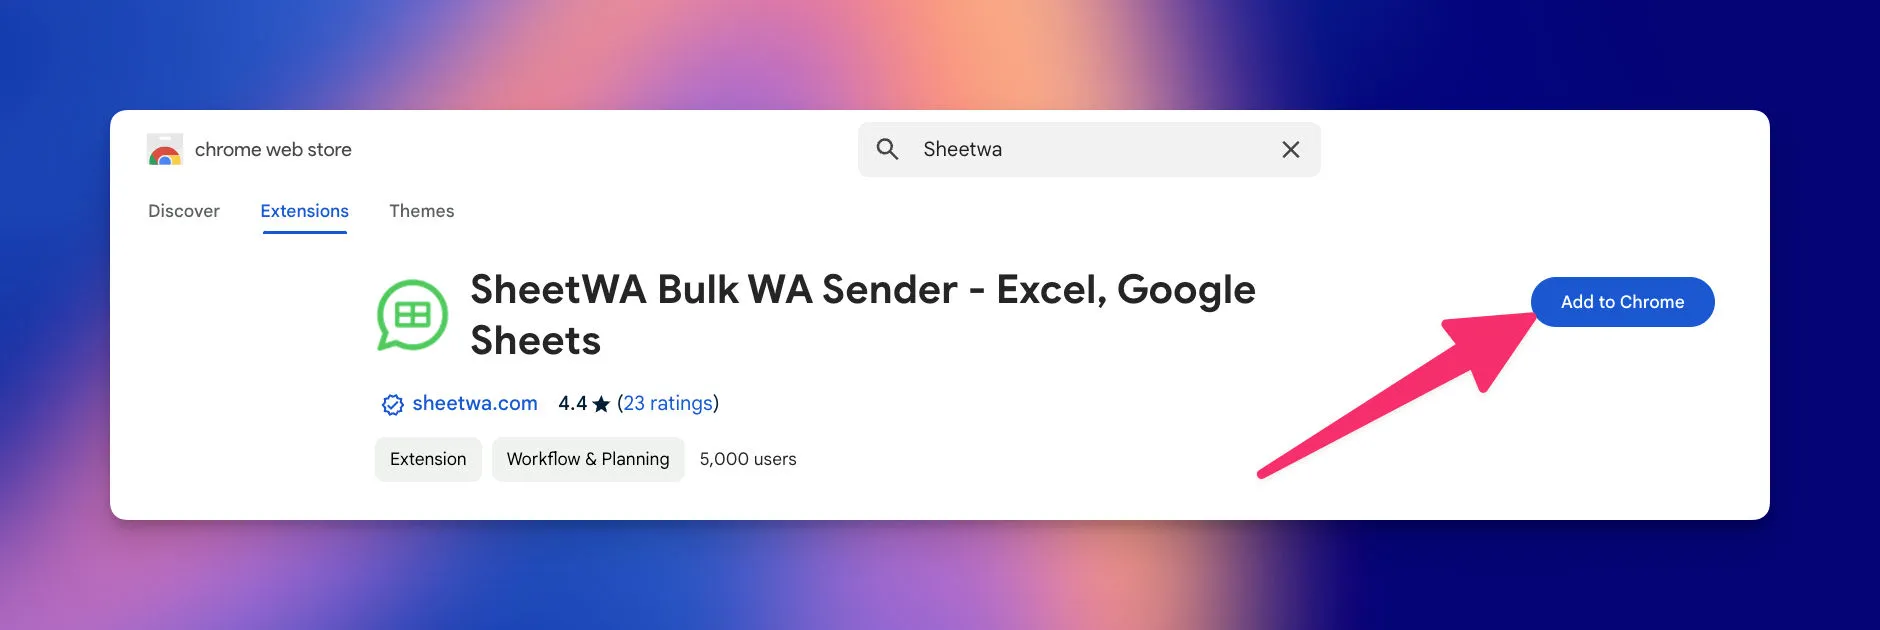
Next, you need to install the SheetWA extension. This step is simple and does not require any knowledge of the whatsapp business api. Go to the SheetWA website. Look for the “Get Started for Free” button. Click it, and you will go to the Chrome Web Store. Find the SheetWA extension and press “Add to Chrome.” A pop-up will ask you to confirm. Click “Add Extension.” Chrome will download and install SheetWA for you.
After the installation, WhatsApp Web will reload automatically. You will see the SheetWA plugin appear on your screen. This setup lets you send bulk messages from your whatsapp business app without any extra software or the whatsapp business api.
Quick guide to help you remember the steps:
Go to the SheetWA website.
Click “Get Started for Free.”
Install the Chrome extension.
Sign in with your Google account.
Load WhatsApp Web; SheetWA appears as a plugin.
Note: You do not need to set up the whatsapp business api or deal with any coding. SheetWA works directly with your whatsapp business app and WhatsApp Web.
Sign in with Google
Now, you need to sign in with your Google account. This step connects your data to SheetWA, so you can send messages using your contact lists. When you open SheetWA, you will see a “Sign in with Google” button. Click it. A window will pop up with your Google accounts. Choose the account you want to use. Grant the permissions needed for SheetWA to access your Google Sheets.
Once you sign in, WhatsApp Web will refresh. The SheetWA interface will show up, ready for you to start your messaging campaign. You do not need to set up the whatsapp business api or worry about technical details. SheetWA makes the setup process smooth and quick.
You are now ready to use SheetWA with your whatsapp business app. This guide helps you connect everything without any stress. You can start sending messages to your customers right away.
Home Screen Overview
When you open SheetWA on WhatsApp Web, you see a dashboard that makes everything easy. The bottom right corner shows your WhatsApp number and the version of SheetWA you are using. You can check how many messages you have left in your quota at the top left. If you use the free plan, you see an "Upgrade" button there.
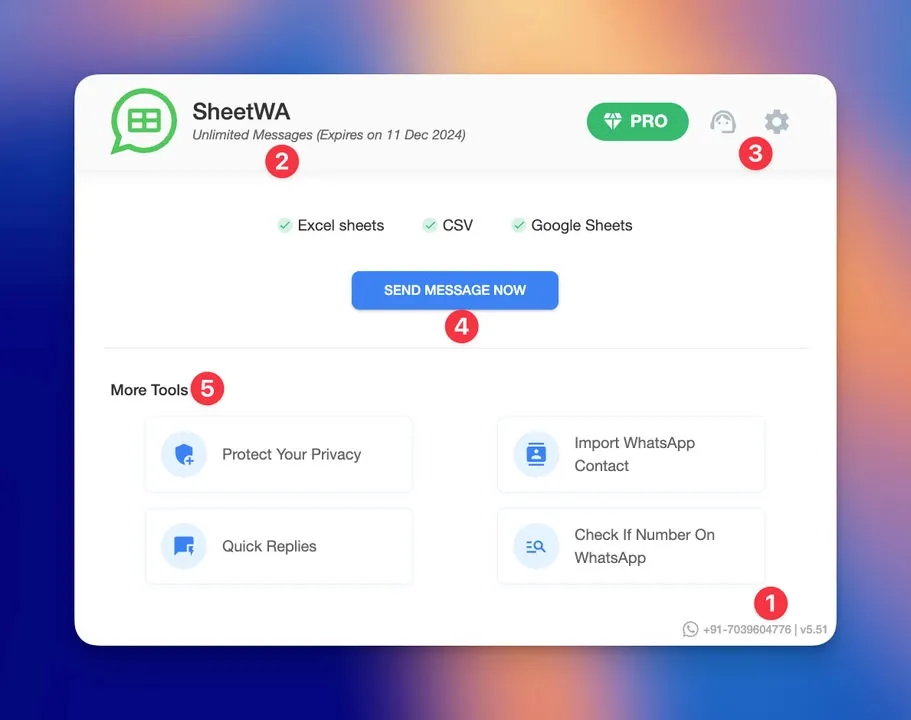
The top right corner has a gear icon for settings. Click it to see your profile, message reports, and customer support options. You can also change other account settings here. In the center, you find the "Send Message Now" button. This button starts your messaging campaign.
Tip: Explore each section before you begin. This helps you find everything quickly when you start your setup.
Data Preparation (Google Sheets, Excel, CSV, Copy-Paste)
You need to get your contact list ready before you send messages. SheetWA lets you use Google Sheets, Excel files, CSV files, or even just copy and paste numbers. Pick the method that works best for you.
If you use Google Sheets, copy the sheet URL and paste it into SheetWA. For Excel or CSV files, upload the file from your computer. If you have a small list, you can copy and paste numbers into the box.
Main ways to prepare your data:
Google Sheets: Use the sheet URL. Select the tab with your contacts.
Excel Files: Upload your .xlsx or .xls file. Choose the right sheet if you have more than one.
CSV Files: Upload your .csv file. Make sure your columns are clear.
Copy-Paste: Paste numbers directly. This works for quick campaigns.
Make sure your phone numbers are in the right format. You can use numbers with or without country codes. If you want to send messages to people in different countries, organize your data with separate columns for country codes and phone numbers.
Note: Double-check your list before you start. Clean data helps your messages reach the right people.
Country Code Settings
Setting the country code is important for sending messages to people in different places. SheetWA gives you three options for country code setup. You choose the one that matches your data.

Here are the options:
Number without Country Code: Use this if your numbers do not have country codes. SheetWA adds the default country code you set.
Number Contains Country Code: Pick this if your numbers already include country codes. SheetWA uses the codes from your data.
Country Code from Column: Select this if you have a separate column for country codes. SheetWA combines the code and the number for each contact.
Table to help you decide:
Option | When to Use | What SheetWA Does |
|---|---|---|
Number without Country Code | Local numbers only | Adds default country code |
Number Contains Country Code | Numbers with country code included | Uses your data as is |
Country Code from Column | Separate columns for code and number | Combines code and number |
🚩 Always check your country code settings before you send messages. This step helps you avoid mistakes and makes sure your messages go to the right people.
Now you are ready to move on to mapping fields and personalizing your messages. The setup process is simple when you follow these steps.
Map Fields and Personalize Messages
You want your messages to feel personal, right? SheetWA makes this easy. You can send each customer a message that uses their name, order number, or any detail you have in your file. Let’s break down how you do this step by step.
Prepare Your Audience File
Start by making a list of your contacts. Use Excel, Google Sheets, or a CSV file. Add columns likePhone,Name, andOrderID. Each column holds one type of information. For example, theNamecolumn has the customer’s name, and theOrderIDcolumn has their order number.Import and Map Fields
Open SheetWA on WhatsApp Web. Choose your file and upload it. SheetWA will show you all the columns in your file. You need to tell SheetWA which column is the phone number, which is the name, and which is the order ID. This is called “mapping fields.”
Here’s a simple table to help you remember:
Column in Your File | What It Means in SheetWA |
|---|---|
Phone | Recipient’s WhatsApp number |
Name | Customer’s name |
OrderID | Order number |
Craft a Personalized Message Template
Now you get to write your message. You can use special tags like{Name}or{OrderID}. SheetWA will replace these tags with the real information for each customer. For example, your message might say:Hello {Name}, your order {OrderID} is ready for pickup.
When you send messages, SheetWA changes{Name}to the customer’s actual name and{OrderID}to their order number.
Tip: Personal messages get more replies. Customers like seeing their name and details in your message.
You can save your message as a template. Next time, you just pick the template and send your campaign even faster.
Personalizing your messages helps you build trust. Customers feel special when you use their name. You can also add other details, like appointment dates or product names. SheetWA lets you map as many fields as you need.
Ready to make your messages stand out? Start mapping your fields and watch your customer engagement grow!
Delivery Report and Time Gap
After you send your WhatsApp messages with SheetWA, you want to know if they reached your customers. That’s where the Delivery Report comes in. This feature shows you which messages went through and which ones didn’t. You get a clear view of your campaign results right on your dashboard.

How to Check Your Delivery Report
Click the “View Report” button after your messages finish sending.
See a list of all the phone numbers you messaged.
Look at the status for each message. You’ll see if it was sent, not sent, or if there was a problem.
Simple table to help you understand what you’ll see:
Status | What It Means | What You Should Do |
|---|---|---|
Sent | Message delivered to the recipient | No action needed |
Not Sent | Message didn’t go through | Check the number or country code |
Not on WhatsApp | Number isn’t registered on WhatsApp | Update your contact list |
Number Missing | No phone number in your data | Add the missing number |
Tip: If you see “Not Sent” or “Not on WhatsApp,” double-check your contact list. Make sure every number is correct and includes the right country code.
You can use filters to sort your report. Want to see only the messages that failed? Just click the filter and fix those contacts before your next campaign.
Why the Time Gap Matters
When you send lots of messages at once, WhatsApp might think you’re spamming. SheetWA helps you avoid this by letting you set a time gap between each message. This makes your messages look more natural.
Here’s how you set the time gap:
Choose a time interval, like 5 to 15 seconds, before you start sending.
SheetWA sends each message after a random pause. This mimics how a real person would send messages.
🚦 Setting a time gap keeps your WhatsApp account safe. It also helps your messages reach more people without getting blocked.
Steps to Adjust the Time Gap
Go to the advanced settings before you send your campaign.
Find the “Time Gap” option.
Pick how many seconds you want between each message.
Start your campaign. SheetWA handles the rest.
Benefits of Using Delivery Reports and Time Gaps
You know exactly which messages reached your customers.
You can fix problems with your contact list fast.
You keep your account safe from spam flags.
You make your campaigns more successful.
Note: Always check your delivery report after each campaign. Use the time gap feature every time you send bulk messages. These two steps help you get better results and protect your business.
Now you’re ready to track your messages and send them safely. SheetWA gives you the tools to manage your campaigns like a pro!
Now you know how to make a whatsapp business account. You learned how to set up your business profile. You also learned how to use whatsapp to talk with customers. If you want to send messages to lots of people, SheetWA helps you do it easily. Following these steps helps you build trust with customers. It also keeps your whatsapp business account safe. If you ever need help, there are resources and support for you.

FAQ
How do I switch from personal WhatsApp to WhatsApp Business?
You just download the WhatsApp Business app, use your current number, and follow the prompts. The app lets you move your chats and contacts. Always back up your data first so you don’t lose anything important.
Can I use WhatsApp Business and personal WhatsApp on the same phone?
Yes, you can! You need two different phone numbers. Install both apps. Use one number for personal chats and the other for business. This keeps your work and personal messages separate.
What is SheetWA, and do I need it for WhatsApp Business?
SheetWA is a browser extension that helps you send bulk WhatsApp messages from your computer. You don’t need it to run WhatsApp Business, but it makes sending lots of messages much easier and faster.
Do I need technical skills to use SheetWA?
No, you don’t! SheetWA works with simple steps. You upload your contact list, map your fields, and send messages. The interface is user-friendly. You don’t need to know any coding.
Can I send media files with SheetWA?
Yes, you can attach images, videos, or documents to your messages. Just click the “Attach Media” option when setting up your campaign. This helps you share product photos, flyers, or important documents with your customers.
What should I do if my WhatsApp Business verification fails?
First, check your phone number and internet connection. Make sure you entered the correct country code. If you still have trouble, restart your phone or reinstall the app. Sometimes, waiting a few minutes helps.
How do I keep my WhatsApp Business account safe from being blocked?
Always get permission before messaging customers. Use time gaps between messages. Avoid sending the same message to many people at once. Personalize your messages. Follow WhatsApp’s rules to keep your account safe.
Can I update my business profile after setup?
Yes, you can update your business details anytime. Go to your profile settings in the app. Change your address, hours, or description as needed. Keeping your info current helps customers trust your business.